
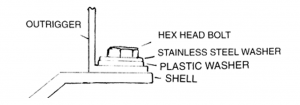
Winged Aero and MAAS 24
On the Winged Aero and Maas 24 you will need to lay a small bead of silicone around each bolt hole on the deck and position the rigger over the holes (a second person is useful here).
Bolt the outrigger to the shell using this sequence of bolts & washers:
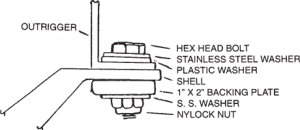
Flyweight, MAAS 27 and MAAS Double
Pitch and Spread for All Shells
To set the oarlock pitch and spread you will need:
Small level or pitch gauge
9/16 open end/box wrench
Crescent wrench or 5/8 open end wrench
- Level shell fore and aft by placing level on the flat surface where the wing mounts on the deck.
- Insert oarlock pin into oarlock clamp and install nut and washer. Do not tighten yet.
- Remove oarlock from pin. Slide pins to desired spread. Measure from each pin to opposite seat track to make sure pins are centered with shell. Tighten.
- Tape or rubber band small level to pin.
- Using the 9/16 open end wrench as a lever, pivot oarlock pin until it is a little aft of vertical. This will allow pin to pivot into a vertical (plumb) position as the nut is tightened.

Tighten pin nut. If the pin is not vertical when it is fully tightened, loosen the nut, lever pin in proper direction and re-tighten. It may take several tries to get it just right. The pin is vertical when the horizontal level bubble is centered.
Note: It is more important that both pins be at the same angle (pitch) than exactly vertical.
If you find that you want more or less oarlock height than you are able to get by adjusting the plastic spacers on the pin, we offer plastic wedges that will raise or lower the wing according to your need. To raise the wing, install the wedge with the large end forward; to lower, install with the small end forward.
Classic Aero (Discontinued)
The Classic Aero is equipped with carbon fiber/fiberglass outriggers. As with the Winged Aero and Maas 24 you will need to lay a small bead of silicone around each bolt hole on the deck and position the rigger over the holes (a second person is useful here).
On the Aero riggers, the two bolts forward screw into stainless steel threaded inserts; the two aft bolts pass through backup washers and are secured with nylon lock nuts. You will have to remove the inspection port and storage bag behind it to install these. If you put a bead of silicone on the fender washer it will help to hold the washer in place as well as provide additional waterproofing. Start with the forward bolts and tighten until both are barely snug, then slide the two aft bolts into position. Now go back and tighten down the forward bolts, then finish with the aft bolts. The forward bolts can be tightened with the screw- driver alone. You will need to use the wrench to hold the nuts in place aft while you tighten these bolts. Replace the bag and inspection port, wipe off any excess silicone; the silicone will be fully cured in a day.
The pins and oarlocks are installed with two crescent wrenches or a 9/ 16 and a 5/8 inch open end or box wrench. We suggest that you place the pins as close as possible to the outside end of the slot in the rigger, and equidistant from the centerline of the boat. To accomplish this it is easiest to measure from the outside edge of the far seat track to the inside edge of the pin. When adjusted, tighten firmly. A tip is to leave the flat face of the shoulder of the pin parallel to the side of the shell. That way, a quick glance at the pin will tell you if the pin has loosened and requires tightening. Reminder: you should check the tightness of those bolts every few months, especially if you use the shell frequently.
For a more in depth discussion on rigging check our article on “Rigging for Open Water“